|
The Manage Recipients page allows you to add new recipients and edit or
delete existing ones. Once you have entered a recipient, you can also add one
or more payment templates for later use (See help with Managing Payment
Templates). Recipients and saved templates are used when initiating
Payroll, ACH Payments, ACH Receipts and Wire Transfers from the respective
commercial payment menus in online banking.
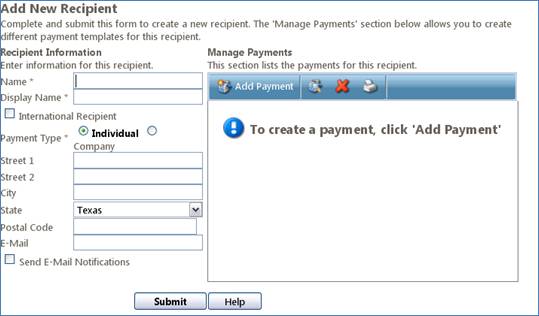
Adding a Recipient
To save a recipient and add a payment template for the recipient, follow
these steps:
- From the Commercial>Recipients menu, select “Add a
Recipient” from the toolbar.
- Fill in the required information for the recipient,
including: Name, Display Name, Street 1, Street 2, City, State, Postal
Code and Email address, and indicate if this recipient is an individual
or company. This information will be shared for every payment created
for this recipient. If your recipient is international, check the
“International Recipient” checkbox to enter an international address.
The ‘Send Email Notifications’ checkbox can be checked to, by default,
send an automated email to the recipient for every payment made to them.
This default value may be overridden when initiating the payment.
NOTE: If you do not make a selection for EVERY account, you will get an
error message stating “You have not made a selection for one or more of
your accounts. You must select a statement delivery preference for each
account.”
- Saving a Payment Template: When you add a new recipient,
there will not yet be any payments listed under the "Manage
Payments” section of the page. If you would like to add a payment to the
recipient, choose “Add a new payment” from the drop down list and click
the “Submit” button. Otherwise, you can choose to ‘Submit Recipient’ and
add payment templates to the recipient at a later time.
- When you choose to ‘Add a new payment’ you are directed to
the “Add New Payment” page. This page will allow you to create and save
a payment template that can be used when initiating a transaction for
this recipient. See Manage Payment
Templates for help in creating and maintaining payment templates for
a recipient.
- Once the payment data is added, click “Submit” to add the
payment template to the recipient. You will be returned to the page
showing the recipients information. The new payment will now appear in
the list under the “Manage Payments” heading. You can repeat the process
starting at step 3 to add more new payment templates.
- Once your payment templates have been added and you are
returned to the recipient’s page, click ‘Submit Recipient’ to add the
new recipient to the system. The recipient and templates can now be used
to initiate transactions in online banking.
Editing a Recipient
To edit a recipient or payment templates
for a recipient, select the recipient and click the ‘Edit Recipient’ icon from
the toolbar. Or, double-click on the
recipient grid. You will be directed to the recipient page where you can make
changes to the shared recipient information or Manage Payment
Templates. Edited shared recipient information will be effective on all
future payments made to this recipient, but will not update currently
scheduled payments with the new information.
Removing a Recipient
To remove a recipient and payment templates for a recipient, click the ‘X’
from the toolbar. Or, you can double-click on the recipient grid. You will be
asked to confirm the deletion of the recipient. WARNING: Deleting a recipient
will also delete all payment templates saved for the recipient; however, any
scheduled payments to the recipient WILL NOT be automatically deleted, and
must be deleted manually.
|
|
A: No, if you are sending a payment to a recipient that you will likely never
pay again, you can enter the payment information directly into the
appropriate commercial payment menu, such as a wire transfer. Or, if you have
a NACHA compliant payroll file, you can upload the file into our system. See
help with Making Commercial Payments to learn the different ways to make
payments.
A: Not at this time. You can make one-time payments by uploading recipients and
payments via a NACHA compliant file upload, but those recipients and payments
are not stored for later use.
A: You can save an email address for the recipient, and then uncheck the
notification on individual payments or for the selected recipient in a batch
at the time the payment is made. The email address stored for the recipient
is to populate the payment for you, and can be overridden on single payments.
On batch payments, you can choose to send or not send the notification, but
to change the address you will need to update the recipient information.
A: A payment template is a group of payment-related information that can be
stored and reused on successive payments, either as a single payment or as
one payment in a batch.
|